Rule Settings
Virtual Zone/Line (ROI)
For each rule type, you can define a Virtual Zone or Line (Region of Interest - ROI) to monitor objects within specific areas or directions of the image.
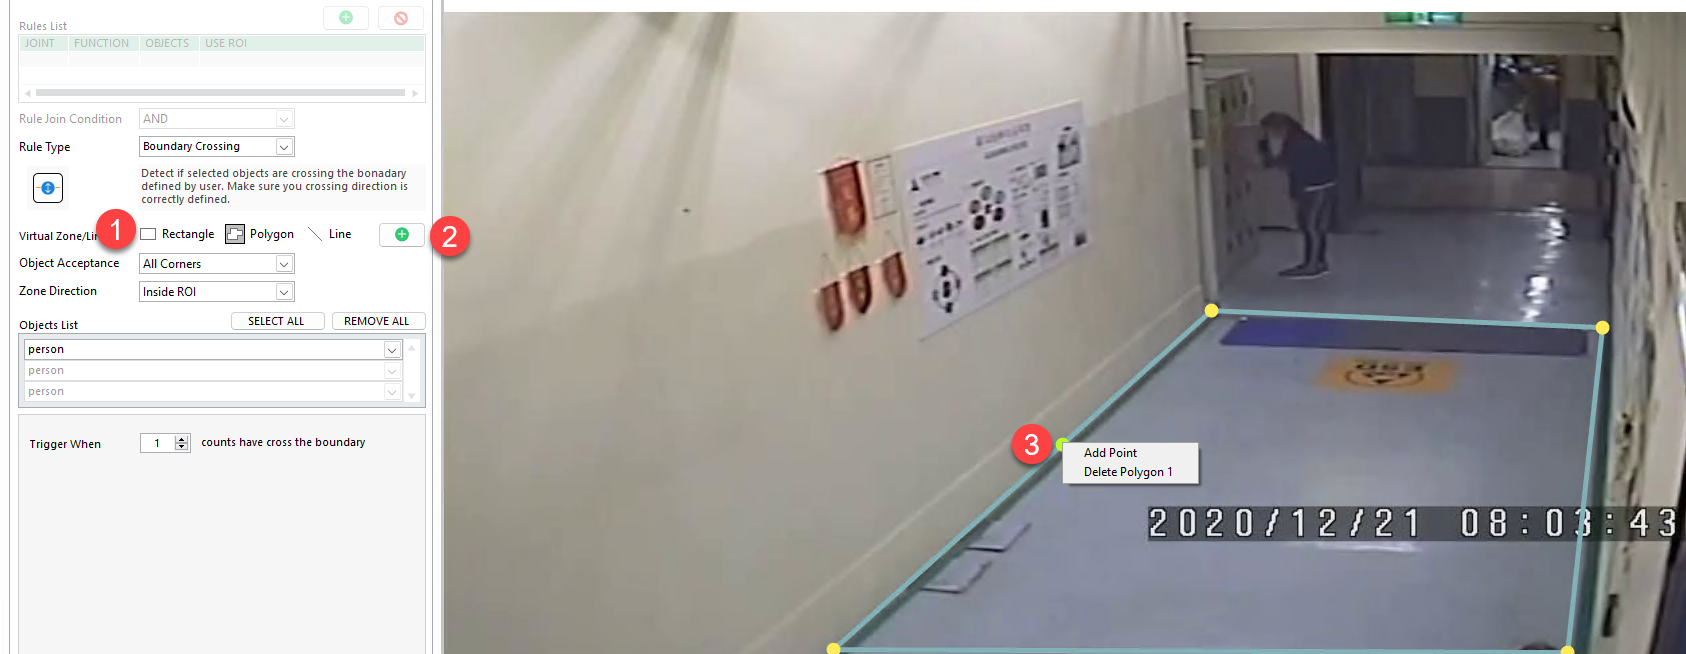
To add a ROI:
- Select the shape type
Rectangle,PolygonorLineprovided for each rule - Click the
+button to add a shape to image - Drag and drop the shape to adjust its size. Right-click on the shape for extra setting
- Additionally, you can adjust the
Linethickness using theROI Gapparameter. This will help reduce false detection when object wanders around the line.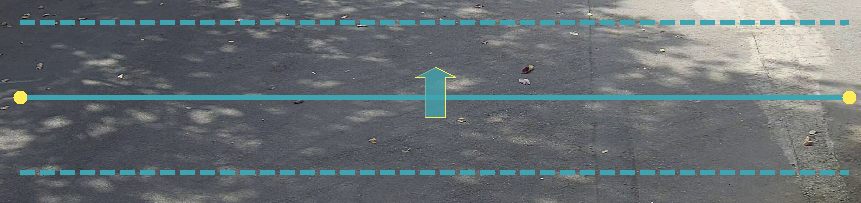
Object Acceptance
This feature is only available for rectangle or polygon ROI
When an object is detected, it is enclosed in a bounding box. The Object Acceptance setting determines which part of this bounding box must intersect with the ROI for valid detection

You can choose from the following acceptance modes:
All Corners: All four corners of the bounding box must be inside the ROI.Centre point: Only the center of the bounding box needs to be inside the ROI.Any corner: At least one corner of the bounding box must fall within the ROI.Any Overlapping: Any part of the bounding box overlapping the ROI qualifies as a valid detection.- And other overlapping options
Zone Direction
After defining the ROI and Object Acceptance method, choose a Zone Direction to specify how the object must move or be positioned relative to the ROI for it to trigger a detection.

Available options include:
Inside ROI: The Object Acceptance is located within the ROI.Outside ROI: The Object Acceptance is located outside the ROI.Right side: The Object Acceptance enters the ROI from the left and moves to the right.Below: The Object Acceptance enters the ROI from above and moves downward.Left side: The Object Acceptance enters the ROI from the right and moves to the left.Above: The Object Acceptance enters the ROI from below and moves upward.Both directions: The Object Acceptance can move in either direction to trigger detection.
Object List
The Object List allows you to filter and select only the object classes (from AI models) you want to monitor.

Available actions:
- Click
Select Allto include all object classes from the model. - Use the dropdown list to manually select object classes you want to monitor.
- Click
Remove Allto clear all selected objects from the list.
Pipeline and Filter (optional)
The pipeline and filter option are only supported for specific models
Pipeline
The Pipeline option allows the system to read extra info from the detected objects —if such content exists.
- ALPR: Detect license plate information
- OCR: Detect text information
- Barcode/QR: Detect Barcode/QR information
Filter
When you enable Configure Filter, this create an additional condition to trigger event. This means an event will only be triggered if the detected object meets the filter requirement.
ALPR filter
The ALPR filter allows you to filter detection based on registered plates, unregistered plates, or group membership in license database. This means instead of detecting every visible plate, ANSVIS tasks can now focus on specific scenarios — such as parking systems, restricted areas, or monitoring VIP/blacklisted vehicles.
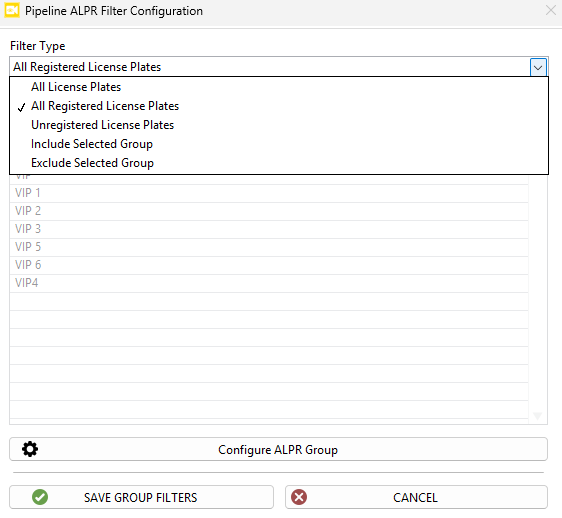
Refer to ALPR Service to manage license database
OCR and barcode filter
From the pipeline filter configuration, you can:
- Specify which TEXT need to be found to trigger event.
- Apply logical operators (
AND/OR) to combine each text conditions. - There might be some other objects included in the filtered event; you can choose what to do with objects and text that don’t meet the condition.

Combine Rules
After saving a rule, you can continue adding another rule to the same task. These 2 rules can be combined using the Rule Join Condition option.

This setting determines how multiple rules are evaluated together. This allows you to create flexible, multi-rule logic for more precise event detection.
- Use
ANDto trigger the event only when all rules are TRUE. - Use
ORto trigger the event when any rules is TRUE. - Use
IF-THENso that IF rule 1 is true, THEN rule 1 will stay true for X seconds. During that time, the event is triggered when rule 2 is TRUE.